The following tips and ideas will help to make your painting projects easier. These instructions and suggestions can save you time and effort while helping you end up with a better-looking paint job.

 |
 PREPARE THE SURFACE BEFORE PAINTING
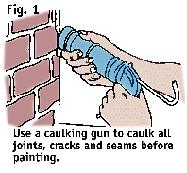
- Take time to caulk all joints, cracks and seams in the surface before painting (Fig. 1). This is easy and quick with a caulking gun and caulking cartridges. Don't start painting until the caulking is finished and thoroughly dried.
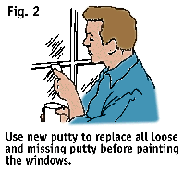
- Before painting windows, check around the window panes for loose or missing putty (Fig. 2). Replace the putty in these areas before starting the painting job. Use a good grade of putty and apply it according to the manufacturer's instructions.
- Always clean the surface to be painted. Use a wire brush, sanding block or power sander to remove loose paint and grime before applying the primer coat. If you try to cut corners and save time by failing to clean the surface, you'll likely end up with trouble later.
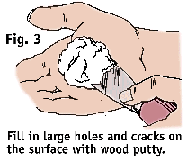
- Fill in any cracks or large holes appearing on the surface with wood putty before starting the painting job (Fig. 3). The putty should have the texture of paste, as illustrated below. Allow time for the wood putty to dry before applying the primer coat.
- Use a special V-shaped putty knife for puttying along a window sash (Fig. 4). This special tool is inexpensive and helps you do a professional-looking job much faster and easier.
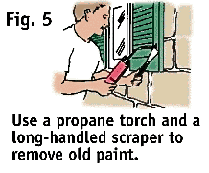
- If you need to remove a heavy build-up of old paint, use a propane torch to help make the job faster and easier. A wide-mouth burner tip is available to spread the flame over large areas. Use a long-handled scraper to keep your fingers away from the heat as you work (Fig. 5).
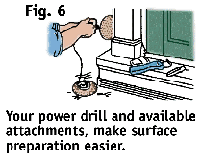
- Use your power drill for smoothing rough spots before painting (fig. 6). Purchase a sanding wheel drill attachment to make sanding much easier. A wire brush attachment for your power drill is an excellent tool for removing rust and scale from metal.
- Use plastic or paper drop cloths to cover sidewalks, shrubbery or other areas needing protection before you start the painting. Use drop cloths to cover floors, furniture, etc., for indoor painting. These cloths are inexpensive and save you a lot of clean-up time.
|

 |
 PROVEN PAINTING POINTERS
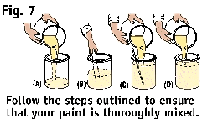
- Thoroughly mix the paint by following the steps outlined in Fig. 7. Pour off, into another container, any thin portion of the paint that is floating on top (A). Use a paddle to stir the paste settled in the bottom of the can (B). Stir in a small amount of the thin portion of the paint and use the paint paddle to stir with a figure eight motion. As you stir, gradually mix the thin portion back into the main paint can (C). Finally, pour the paint back and forth from one container to another (D). This will thoroughly mix the paint and bring it to the proper thickness for application.
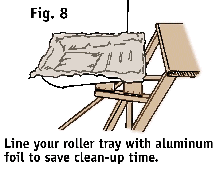
- Save a lot of clean-up time by lining your roller tray with a plastic tray liner. If you do not have a plastic liner, use aluminum foil (Fig. 8). Press a large piece of aluminum foil tightly against the sides of the tray. When you're finished painting, you can simply remove the aluminum foil and throw it away. This leaves little or no clean up.
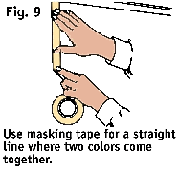
- Use masking tape where two paint colors come together for a much neater job. Apply the masking tape at the point where the two colors join. Then remove it when the paint is dry for a much smoother joint between the two colors than you'll get by free-hand painting (Fig. 9).
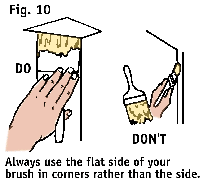
- When you're painting corners, always use the flat side of the brush (Fig. 10). Painting with the side of the brush causes "fingering." Your paint job will be neater and your brush will last a lot longer when you use the flat side of the brush, as illustrated.
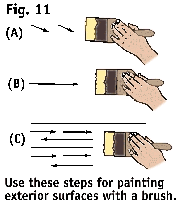
- Fig. 11 shows how to use a paint brush for best results when painting exterior surfaces. First, dip the paint brush into the can to load the bristles about half-way with paint. Never dip more than half of the brush into the paint. After loading half the bristles with paint, touch the brush lightly to the surface at several points to apply spots of paint (A). After applying the spots of paint, use long leveling brush strokes to smooth out the spots (B). Finish each area with back and forth motions and zig-zag strokes (C). A little practice with a brush will enable you to complete a professional-looking painting job with minimal effort.
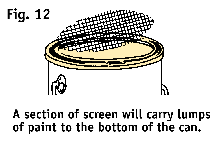
- If you've had the paint for a long period of time, it may contain impurities such as dirt or lumps. There is no need to throw this paint away. Instead, cut a disk of window screen to fit just inside the paint can (Fig. 12). The screen will sink down into the paint and carry the lumps to the bottom of the can as the level of the paint is lowered.
- You can avoid paint rings and drips on the floor by sticking a paper plate to the bottom of the paint can before you start the job. Just apply a little paint to the bottom of the can and press the paper plate against it. The paper plate will stick to the bottom of the can and prevent the paint from dripping onto the floor.
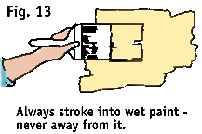
- Avoid paint ridges and lap marks on a flat surface by always stroking into the wet paint area, never away from it (Fig 13). Blend each stroke of the brush toward the wet paint area, bringing the layer you're applying into the wet paint previously applied.
- If you are planning a small outside painting job, you may be bothered by insects flying into the newly applied paint. To avoid this problem, add a small amount of insect repellent to the paint when it is mixed. Do not use too much - a small amount will do the trick without damaging the color or quality of the paint.
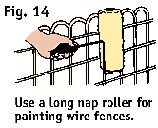
- Paint wire fences with special, long nap rollers (Fig. 14). As this type of roller is pushed across the face of the wire fence, paint is applied to the front and sides of the wire. Repeat on the opposite side and the job is done. The fence can be painted in almost a single stroke if the correct roller is used.
- When you're painting with a roller, start the job by making several criss-cross strokes on the area to be painted (Fig. 15). After you've made these strokes, continue to work up and down to spread the newly applied paint evenly over the area. For painting trim work, use a special trim roller or a brush.
- You can purchase special rollers for painting beveled or weather-boarded areas (Fig. 16). Use a special "doughnut-shaped" roller to paint the underedges of weather board. Use a wider type roller for painting the main surface area. By using rollers of these special types, you can paint the entire exterior of the house without touching a brush.
|
 CLEANING UP AFTER THE PAINT JOB
- Special waterless hand cleaners remove both latex-base and oil-base paints easily and quickly. These waterless hand cleaners will not irritate your skin like many solvents. Wipe the paste-type cleaner on your hands, wipe it off, and the paint will come off with it.
- Take care of your brushes by cleaning them carefully after each painting job is done and then wrapping and storing them for future use. Fold wax paper around the brush and seal it with a rubber band.
- Wash latex paints out of a brush with clear warm water.
- Clean brushes used with oil-base paints with regular paint cleaner or some type of solvent. Clean the brush thoroughly, then wrap it in wax paper and store it for future use.
- Clean rollers in the same basic way as paint brushes. Take time to clean them thoroughly.
|
T O O L A N D M A T E R I A L C H E C K L I S T
|
Paint Brushes |
Roller Tray |
Ladder |
Extra Paint Bucket |
 |
Paint Scraper |
Putty |
Wood Putty |
|
Caulking Gun |
1/4" Power Drill |
Wire Wheel (Drill) |
Special V-Shaped Putty Knife |
|
Long-Handled Putty Knife |
Paint Rollers |
Wire Screening |
Solvent |
|
Masking Tape |
Drop Cloths |
Putty Knife |
Crack Filler |
|
Caulking Compound |
Sanding Disk |
Sandpaper |
Wire Brush |
| Propane Torch |
|
How To Paint Menu:
Wood Decks, Fences and Siding, Introduction
Cleaning Wood Decks, Fences and Siding
Refinishing Wood Decks, Fences and Siding
Reduce Attic Heat with Radiant Barrier Paint
Painting Ceilings with Insulating Paint
Painting Walls and Trim
Roof Coatings Application
Insulate RV and Mobile Home with Roof Paint
Paint Siding
Paint Stucco
Use a Roller with no mess
How to spray Paint
General Painting Tips
|